Introduction
Earlier this year, Kaiming He et al. released their paper Mask R-CNN on arXiv.
(If you’re familiar with computer vision or deep learning, you may recognize Kaiming’s name from another recent contribution -Resnet ).
In the Mask R-CNN paper, they make some impressive claims, including superior performance on a number of object detection and segmentation tasks.
Here is their abstract:
We present a conceptually simple, flexible, and general framework for object instance segmentation.
Our approach efficiently detects objects in an image while simultaneously generating a high-quality segmentation mask for each instance.
The method, called Mask R-CNN, extends Faster R-CNN by adding a branch for predicting an object mask in parallel with the existing branch for bounding box recognition.
Mask R-CNN is simple to train and adds only a small overhead to Faster R-CNN, running at 5 fps. Moreover, Mask R-CNN is easy to generalize to other tasks, e.g., allowing us to estimate human poses in the same framework.
We show top results in all three tracks of the COCO suite of challenges, including instance segmentation, bounding-box object detection, and person keypoint detection. Without tricks, Mask R-CNN outperforms all existing, single-model entries on every task, including the COCO 2016 challenge winners.
We hope our simple and effective approach will serve as a solid baseline and help ease future research in instance-level recognition.
Code will be made available.
Just this past week, the codebase for Mask R-CNN was made public on GitHub, and it generated a bit of buzz on Reddit.
Since I was in need of a pre-trained object detection model for work, I decided to take it for a test drive, and check out its segmentation performance too.
Installation
Installation was not exactly simple, but also not not too complicated.
I started with the instructions on the GitHub page, but found I needed a bit more.
I went through the steps generally as follows:
- clone the Mask_RCNN repository
- download the pre-trained COCO weights (mask_rcnn_coco.h5) from the repository’s releases page
- move the weights to the just created
Mask_RCNNdirectory - upgrade tensorflow to >= 1.3
- clone the special forked version of COCO
- run make under
coco/PythonAPI - run python setup.py under
coco/PythonAPI - install missing dependencies using
conda / pipuntil setup works - try to run
demo.ipynbfrom jupyter and cross fingers
Demo
The demo.ipynb notebook that comes with the Mask R-CNN repository is really very good. I’ll use that as a starting point.
After importing packages and modules, loading the pre-trained model and setting up initial parameters, we get right into the meat of the demo. First, note the object classes that are defined:
class_names = ['BG', 'person', 'bicycle', 'car', 'motorcycle', 'airplane',
               'bus', 'train', 'truck', 'boat', 'traffic light',
               'fire hydrant', 'stop sign', 'parking meter', 'bench', 'bird',
               'cat', 'dog', 'horse', 'sheep', 'cow', 'elephant', 'bear',
               'zebra', 'giraffe', 'backpack', 'umbrella', 'handbag', 'tie',
               'suitcase', 'frisbee', 'skis', 'snowboard', 'sports ball',
               'kite', 'baseball bat', 'baseball glove', 'skateboard',
               'surfboard', 'tennis racket', 'bottle', 'wine glass', 'cup',
               'fork', 'knife', 'spoon', 'bowl', 'banana', 'apple',
               'sandwich', 'orange', 'broccoli', 'carrot', 'hot dog', 'pizza',
               'donut', 'cake', 'chair', 'couch', 'potted plant', 'bed',
               'dining table', 'toilet', 'tv', 'laptop', 'mouse', 'remote',
               'keyboard', 'cell phone', 'microwave', 'oven', 'toaster',
               'sink', 'refrigerator', 'book', 'clock', 'vase', 'scissors',
               'teddy bear', 'hair drier', 'toothbrush']
This object class list effectively defines the limits of the pre-trained model.
Make sure your class is in the list.
If it is, you’re good to go with no more training. Otherwise, you’ll have to re-train the model with examples of your class.
Now let’s take a look at some model ouputs.
The demo comes with some pre-canned images that are all impressive, but I’m always skeptical, so I’m going to test with my own image.
The tennis racket object class caught my eye, so I’ll grab a random tennis image from google.
And here it is… Roger Federer in action during a tennis match:
Running the image through the pretrained model is simple:
# Load a the image
image = scipy.misc.imread('federer.jpeg')
# Run detection
results = model.detect([image], verbose=1)
# Visualize results
r = results[0]
visualize.display_instances(image, r['rois'], r['masks'], r['class_ids'],
                            class_names, r['scores'])
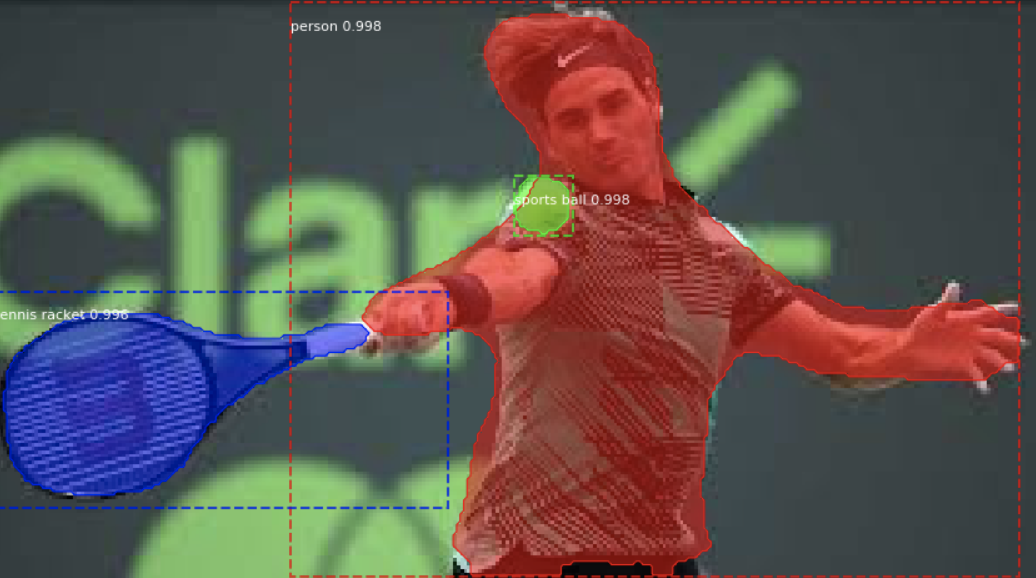
And here is the output:

Beautiful!
The bounding boxes are accurate, and the segmentation masks are just stunning.
The model accurately bounds the racket, the ball, and Federer himself, and the masks seem to be nearly spot on… even following the boundaries of Roger’s flowing hair.
The only mistakes seem to be clipping off the ends of his fingers.
Though I only passed one image to the model, it is possible to pass a batch of images as elements of a list.
Thus, when I inspect the results, I only need to look at the first element. It contains a dictionary with the following elements:
- “rois”: “regions of interest” -image coordinates of the object bounding boxes
- “class_ids”: class ids for the detected objects
- “scores”: softmax confidence associated with each object class assignment
- “masks”: a binary array indicating the segmentation boundary for each object on the image
