Distributed application (Dapp) builds on the blockchain base, so it attracts attention as an application that does not concentrate on specific administrators.
So let's actually look at the mechanism of Dapp by making a simple Dapp.
Here, along with the flow of Truffle 's tutorial Ethereum Pet Shop, I will actually create distributed applications for pet shops on the web. Using the development framework of Truffle, I will write a Smart Contract in the language called "solidity".
The completed drawing is as follows. If you press the button "adopt" of the pet you want to keep, MetaMask will start up, check the displayed amount and fee, create a transaction and pay with ETH.
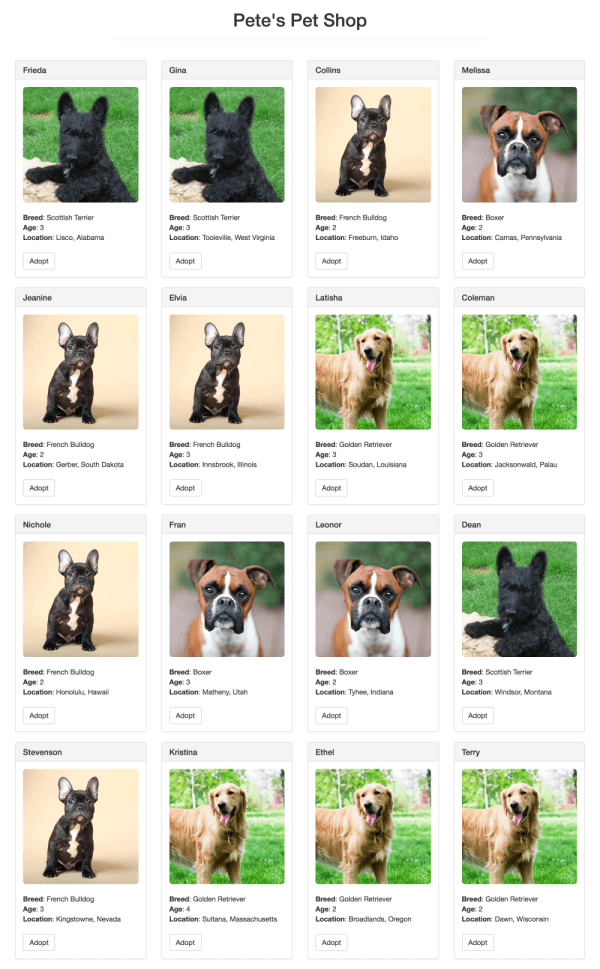
Unlike a regular EC site, you can see that there is no need to enter the personal information or the credit number to purchase. Also, since purchase data are recorded as a transaction in the block chain of Ethernet, it will not be tampered with.
The concrete flow of implementation is as follows.
- Setting up the development environment
- Creating the Truffle project using the Truffle Box
- Making the description of the Smart Contract
- Compiling and Migrating the Smart Contract
- Testing the Smart Contract
- Creating the UI attached to the Smart Contract
- Using the Dapp with browser
Creating the Truffle Project
Let's prepare the environment that can use "node" and "npm".
If the OS is Ubuntu, you can install node.js 8.x as follows.
$ apt-get update
$ curl -sL https://deb.nodesource.com/setup_8.x | bash -
$ apt-get install -y nodejs
First of all, you will install the Truffle.
$ npm install -g truffle
The Truffle is a development framework of Ethereum. It is a very useful framework for smart contract development because compiling and deploying of the source code can be done efficiently.
Create a directory called "pet-shop-tutorial" and work in this directory.
Normally, initialization is done with truffle init, and an empty project is created, but for this tutorial I will create it from a pre-prepared project called the "Truffle Box".
$ mkdir pet-shop-tutorial
$ cd pet-shop-tutorial
$ truffle unbox pet-shop
Then, the following files and directories are prepared inside the pet-shop-tutorial.
The directories and files that are actually used are as follows.
-
contarcts directory: Solidity source files that describe the Smart Contract
-
migrations directory: migration system to be used when deploying the Smart Contract
-
test directory: Test files written in Javascript and Solidity
-
truffle.js: Truffle configuration file
Solidity is a programming language that describes the Smart Contract of the Ethereum.
Description of the Smart Contract
I will write the Smart Contract with solidity.
Create a file called "Adoption.sol" in the created contracts directory and write the following.
pragma solidity ^0.4.4;
 contract Adoption {
  address[16] public adopters;
 function adopt(uint petId) public returns(uint) {
   require(petId >= 0 && petId <= 15);
   adopters[petId] = msg.sender;
   return petId;
  }
 function getAdopters() public returns (address[16]) {
   return adopters;
  }
 }
Let's look at each part in turn.
pragma solidity ^0.4.4;
Specifying the version of the solidity compiler.
Also, solidity adds a semicolon (;) at the end of the line like javascript.
contract Adoption {
 ・・・
 }
I declare a contract named Adoption.
I will implement the contract in this.
address[16] public adopters;
Here I declare a state variable called "adopters". Since solidity is a static language, it is necessary to declare the data type of the variable, solidity has a unique data type "address" in addition to general data types such as string and uint. "Address" contains the address of the account.
Here address is an array, and the variable called "adopters" will have 16 addresses.
Also, here it is described as public before the "adopters" variable, and public variables can be viewed by anyone who can get access to that contract.
After declaring the variable like this, I declare the method of the contract.
function adopt(uint petId) public returns (uint) {
  require(petId >= 0 && petId <= 15);
  adopters[petId] = msg.sender;
  return petId;
 }
The integer type "petId" is set to 0 to 15 according to the array length of adopters. (Since the index number of the array starts from 0)
I use reruire () to make petID 0 ~ 15.
msg.sender represents the address of the person (or the smart contract) that executed this function.
So "adopters [petId] = msg.sender;" adds the executor's address to the adopters array.
And petId is returned as return value.
With the adopt function above, it's now possible to return one address, because petId is the key of adopters array.
However, since it is necessary to do 16 API calls in every reload, I will return the whole adopters array with the following getAdopters function.
function getAdopters() public returns (address[16]) {
  return adopters;
 }
Since the variable "adopters" has already been declared, you can just specify the data type and return the return value.
So I was able to describe the Smart Contract.
To summarize the contents, I have created the following Adoption contracts.
"First of all, there are 16 pets in all. If the user tries to keep a pet, the user's address and the pet's ID are tied up."
Continue to compile and migrate this Smart Contract.
compile
Compiling means translating the source code written in the programming language into a machine language that the computer can directly execute. In other words, I will convert the code written in the solidity language into bytecode so that EVM (Ethereum Virtual Machine) which is the virtual machine of Ethereum will be able to execute it.
In the directory containing Dapp, launch Truffle Develop at the terminal etc.
$ truffle develop
Then enter "compile" at the started truffle develop console.
$ truffle(develop)> compile
It will be successful if the following output is displayed.
Compiling ./contracts/Adoption.sol...
 Compiling ./contracts/Migrations.sol...
 Writing artifacts to ./build/contracts
Although there is a warning which is public, it is OK to go through. (Let's keep the truffle develop console open all the time)
Migration
"Migration" means to migrate an existing system or the like to a new platform in the sense of "moving".
In this case, the migration file will do the deployment of the created Adoption contract to the blockchain network of Ethereum.
If we look inside the migrations directory, there should already be a javascript migration file called "1_initial_migration.js". This file deploys Migrations.sol in the contracts directory and manages it so that a series of smart contracts can be migrated correctly.
Create a migration file named "2_deploy_contracts.js" in the migrations directory. In the migration file, write as follows.
const Adoption = artifacts.require("Adoption");
module.exports = (deployer) => {
  deployer.deploy(Adoption);
 };
Let's run the migrate command on the running truffle develop console.
$ truffle(develop)> migrate
And it will be successful if the following output is done.
Running migration: 1_initial_migration.js
Deploying Migrations...
 ... 0xa1f5bc4affc464999763799648db42acae31772140af652d27f921ee11cb330d
  Migrations: 0x8cdaf0cd259887258bc13a92c0a6da92698644c0
Saving successful migration to network...
  ... 0xd7bc86d31bee32fa3988f1c1eabce403a1b5d570340a3a9cdba53a472ee8c956
Saving artifacts...
Running migration: 2_deploy_contracts.js
  Deploying Adoption...
  ... 0xe46e604dce4322e0492be99b5d3744468e20f8a233e3da551dd42ad9272839b9
  Adoption: 0x345ca3e014aaf5dca488057592ee47305d9b3e10
Saving successful migration to network...
  ... 0xf36163615f41ef7ed8f4a8f192149a0bf633fe1a2398ce001bf44c43dc7bdda0
Saving artifacts...
With that, you can create a Smart Contract, compile it, and deploy it in the test block chain of the local environment. Next, let's test whether this is actually done correctly.
Testing Smart Contract
Testing Smart Contract is a very important step. This is because design mistakes and bugs in smart contracts are related to the user's tokens (assets), which can cause the serious damage to users.
The smart contract test mainly includes the manual test and the automatic test.
Let's check the operation both manually and automatically.
In the case of manual test, you can check the operation of the application by using tools of local development environment such as Ganache. These are easy to understand as they can actually refer to transactions in the GUI.
I will skip the manual test in this article and will do the automatic test below.
In Truffle, the automatic test of the Smart Contract can be described in both javascript and Solidity, but here we will write in Solidity.
In the created test directory, create a file called "TestAdoption.sol" and write the following.
pragma solidity ^0.4.11;
 import "truffle/Assert.sol";
 import "truffle/DeployedAddresses.sol";
 import "../contracts/Adoption.sol";
contract TestAdoption {
  Adoption adoption = Adoption(DeployedAddresses.Adoption());
 function testUserCanAdoptPet() {
   uint returnedId = adoption.adopt(8);
   uint expected = 8;
   Assert.equal(returnedId, expected, "Adoption of pet ID 8 should be recorded.");
  }
 function testGetAdopterAddressByPetId() {
   address expected = this;
   address adopter = adoption.adopters(8);
   Assert.equal(adopter, expected, "Owner of pet ID 8 should be recorded.");
  }
 function testGetAdopterAddressByPetIdInArray() {
   address expected = this;
   address[16] memory adopters = adoption.getAdopters();
   Assert.equal(adopters[8], expected, "Owner of pet ID 8 should be recorded.");
  }
 }
It's a bit long, but let's look at it after disassembling.
pragma solidity ^0.4.11;
 import "truffle/Assert.sol";
 import "truffle/DeployedAddresses.sol";
 import "../contracts/Adoption.sol";
contract TestAdoption {
  Adoption adoption = Adoption(DeployedAddresses.Adoption());
  /*
  *Add a function described later here
  */
 }
At first I import the following three contracts.
- Assert.sol: Various checking work during testing
- DeployedAddresses.sol: Obtain the address of the contract deployed at the test time
- Adoption.sol: Test the Smart Contract
Create a contract called "TestAdoption" and declare the variable adoption. "adoption" contains "DeployedAddresses".
In the TestAdoption contract below, I will define the functions used for testing.
function testUserCanAdoptPet() {
  uint returnedId = adoption.adopt(8);
  uint expected = 8;
  Assert.equal(returnedId, expected, "Adoption of pet ID 8 should be recorded.");
 }
Here I will test the adopt () function defined in the Adoption contract. If the adopt () function is functioning correctly, it will return the same petId (return value) as the number of the argument.
In this case, put petId of 8 into the adopt () function and make sure it matches the return value petId with Assert.equal ().
function testGetAdopterAddressByPetId() {
  address expected = this;
  address adopter = adoption.adopters(8);
  Assert.equal(adopter, expected, "Owner of pet ID 8 should be recorded.");
 }
I'm checking whether the correct owner's address is associated with petId.
Here I'm testing whether the owner's address with pet ID 8 is correct.
By the way, the variable "this" represents the address in the current contract.
function testGetAdopterAddressByPetIdInArray() {
  address expected = this;
  address[16] memory adopters = adoption.getAdopters();
  Assert.equal(adopters[8], expected, "Owner of pet ID 8 should be recorded.");
 }
Finally, check whether the array "adopters" that have all the addresses are returned correctly.
The attribute "memory" is not saved in the "storage" of the contract, it means that it is a temporarily recorded value.
Now that I can write the test, I will run this test file with Truffle Develop.
$ truffle(develop)> test
You have successfully tested when the following output is displayed.
Using network 'develop'.
 Compiling ./contracts/Adoption.sol...
 Compiling ./test/TestAdoption.sol...
 Compiling truffle/Assert.sol...
 Compiling truffle/DeployedAddresses.sol...
TestAdoption
    ✓ testUserCanAdoptPet (133ms)
     ✓ testGetAdopterAddressByPetId (112ms)
     ✓ testGetAdopterAddressByPetIdInArray (196ms)
  3 passing (1s)
Make a UI
So far, I have created the Smart Contract and deployed it in the test blockchain of the Local environment and tested whether it works normally.
Next, let's make a user interface to actually see pet shops on the browser.
The basic structure is already made by Truffle Box, so you will just add a characteristic function in Etherium.
The src directory is the front-end part of the application, and you will edit the /src/js/app.js file in it.
You will add code to ① to ④ in the following app object.
App = {
  web3Provider: null,
  contracts: {},
 init: function() {
   // Load pets.
   $.getJSON('../pets.json', function(data) {
    var petsRow = $('#petsRow');
    var petTemplate = $('#petTemplate');
   for (i = 0; i < data.length; i ++) {
     petTemplate.find('.panel-title').text(data[i].name);
     petTemplate.find('img').attr('src', data[i].picture);
     petTemplate.find('.pet-breed').text(data[i].breed);
     petTemplate.find('.pet-age').text(data[i].age);
     petTemplate.find('.pet-location').text(data[i].location);
     petTemplate.find('.btn-adopt').attr('data-id', data[i].id);
    petsRow.append(petTemplate.html());
    }
   });
  return App.initWeb3();
  },
 initWeb3: function() {
 /*
 *①Add code here
 */
   return App.initContract();
  },
 initContract: function() {
 /*
 * ②Add code here
 */
   return App.bindEvents();
  },
 bindEvents: function() {
   $(document).on('click', '.btn-adopt', App.handleAdopt);
  },
 markAdopted: function(adopters, account) {
 /*
 * ③Add code here
 */
  },
  handleAdopt: function(event) {
   event.preventDefault();
   var petId = parseInt($(event.target).data('id'));
 /*
 * ④Add code here
 */
  }
 };
 $(function() {
  $(window).load(function() {
   App.init();
  });
 });
Let's have a look at the the source code to be introduced to ① ~ ④.
① Instantiation of web3
if (typeof web3 !== 'undefined') {
  App.web3Provider = web3.currentProvider;
 } else {
  App.web3Provider = new Web3.providers.HttpProvider('http://localhost:9545');
 }
 web3 = new Web3(App.web3Provider);
First make sure the instance of web3 is "active". If it is "active", replace it with the web3 object of the created application. If it is not "active", create a web3 object in the local development environment.
② Instantiation of Contract
Since it became possible to communicate with "Ethereum Network" via web 3, you will instantiate the "Smart Contract" created. To do that, we need to tell web 3 where the contract is and how it works.
$.getJSON('Adoption.json', function(data) {
 var AdoptionArtifact = data;
 App.contracts.Adoption = TruffleContract(AdoptionArtifact);
 App.contracts.Adoption.setProvider(App.web3Provider);
 return App.markAdopted();
});
Truffle has a useful library called the "truffle-contract". This is a library on web3, which makes it easy to connect with "contract". For example, the truffle-contract synchronizes the contract information during migration, so you do not need to manually change the deployed address.
The Artifact file is the information on the deployed address and ABI (Application Binary Interface).
ABI represents information on the interface, that is, the variable, function, parameter etc. of the contract.
Insert Artifact into the TruffleContract() function and instantiate the contract.
Then set the App.web3Provider created by instantiating web3 to its contract.
In addition, we call markAdopted () for cases where pets were previously kept. Since it is necessary to update the UI each time the data of the Smart Contract is changed, it is defined by the different "function" of ③ below.
③ UI update
Here I will make sure that the state of the pet kept changed and the UI is updated.
var adoptionInstance;
  App.contracts.Adoption.deployed().then(function(instance) {
  adoptionInstance = instance;
  return adoptionInstance.getAdopters.call();
  }).then(function(adopters) {
  for (i = 0; i < adopters.length; i++) {
   if (adopters[i] !== '0x0000000000000000000000000000000000000000') {
    $('.panel-pet').eq(i).find('button').text('Success').attr('disabled', true);
   }
  }
  }).catch(function(err) {
  console.log(err.message);
  });
First, we call getAdopters () on an instance of the deployed Adoption contract. The call () function does not change the state of the block chain, it merely reads the data, so you do not need to pay gas.
And check whether each petId is tied to an address. If an address exists, change the button to success so that you can not press button.
(4) Manipulating the adopt() function
var adoptionInstance;
 web3.eth.getAccounts(function(error, accounts) {
  if (error) {
   console.log(error);
  }
  var account = accounts[0];
  App.contracts.Adoption.deployed().then(function(instance) {
   adoptionInstance = instance;
   return adoptionInstance.adopt(petId, {from: account});
  }).then(function(result) {
   return App.markAdopted();
  }).catch(function(err) {
   console.log(err.message);
  });
 });
In this case, after confirming the error of the account using web 3, we are processing the actual transaction. Transaction execution is done by the adopt () function, and it takes an object containing the address of petId and the account as argument.
Then, the transaction execution result will be reflected in the UI as the new data by markAdopted () defined in ③.
Now when you are ready to use Dapp, let's use the created Dapp in your browser!
Completion of Dapp
Let's install in advance because we will use MetaMask which is the extension of Chorome. At that time, the account will use the account for Truffle Develop by using the following Wallet Seed. This Seed is displayed when Truffle Develop is executed. (It is common seed)
candy maple cake sugar pudding cream honey rich smooth crumble sweet treat
(If you are using MetaMask now you can go from the menu Lock to the following screen.)
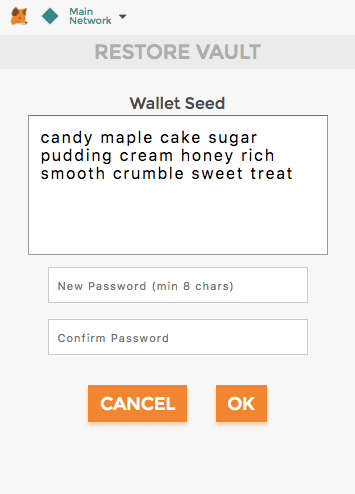
In order to connect the MetaMask to the blockchain created by the Truffle Develop, change it from "Main Network" on the upper left to "Custom RPC". And let's change to http://localhost:9545 for "Truffle Develop". The display changes from "Main Network" to "Private Network".
Accounts made from the above seed should have weak 100ETH. It is drawn by the amount of gas consumed in the contract deployment.
Once you have set up the MetaMask as it has been stated above, you can start the local web server by typing the following to terminal etc. (Since bs - config.json and package.json have been created, you can use the lite - server library)
$ npm run dev
Then, Dapp like the following can be displayed on the browser.
When you click the button "adopt" of your favorite pet, the transaction is sent by "MetaMask", and you can purchase pets by ETH payment!
Summary
Since it is a tutorial this time, I was able to focus on the characteristic part of Dapp in Ethereum using Truffle Box. If you actually do it yourself, you will be able to understand how the Dapp works, even if you do not have the detailed knowledge of the Ethereum blockchain
